How to Mount a Projector to the Ceiling
Professional-level installation guide with safety considerations, proper measurements, and detailed instructions for permanently mounting any projector.
Ceiling mounting a projector transforms a presentation or home theater setup from casual to permanent. It reclaims floor space, eliminates cable clutter, and creates a clean, professional installation. But done incorrectly, it’s a safety hazard: improper mounting can result in the projector falling, damaged ceiling, or water/electrical damage if cables are routed unsafely.
This guide walks through every step of safe ceiling installation. Whether you’re installing a $500 entry-level projector or a $20,000 4K laser system, the fundamentals are the same: locate structural support, secure with appropriate hardware, manage cables properly, and verify stability before leaving the area unattended. This guide covers all of it.
Before You Start: What You Need to Know
- Structural support is non-negotiable: Mount to ceiling joists, never drywall alone.
- Proper tools matter: You need a stud finder, drill, level, and right-sized hardware.
- Projector weight varies: Check specs—most range 10-30 lbs. Hardware must support 3x the weight.
- Ventilation is critical: Leave 12+ inches of clearance above the projector.
- Cable routing affects safety: Never run power cables through walls without proper conduit. Use CL2/CL3 rated cables.
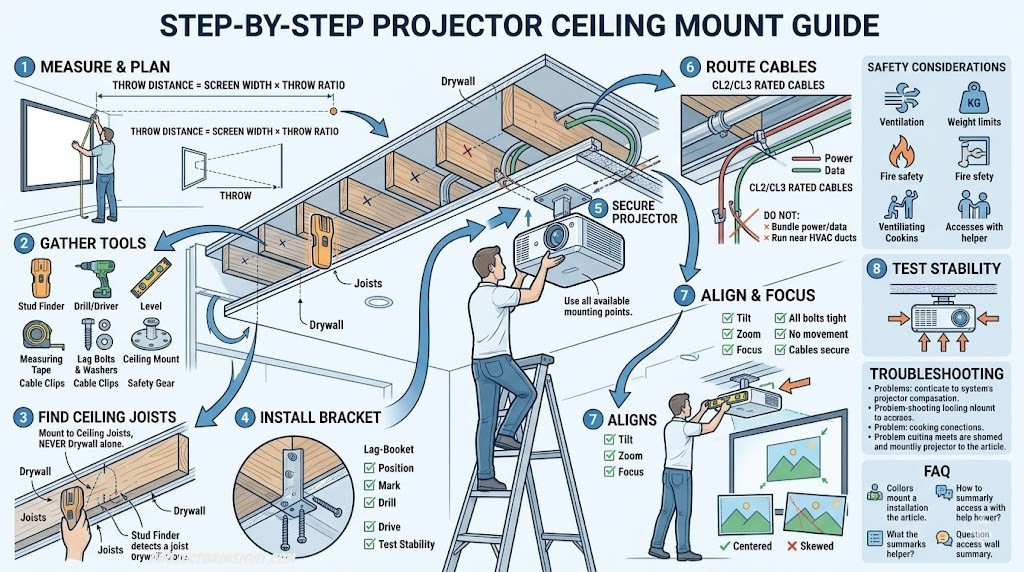
Measure Your Space and Calculate Throw Distance
Before buying a mount, measure your room. The distance from ceiling to screen location determines whether your projector will display the right image size. This measurement is critical—get it wrong and you either can’t fit the projector in the space or you get an undersized image.
Every projector has a “throw ratio”—the relationship between projector distance and image size. For example, a 1.6:1 throw ratio projector needs 1.6 times the screen width as distance. So a 100-inch screen needs 160 inches (13.3 feet) of throw distance with that projector.
Steps: Measure the distance from where your ceiling mount will be to where the screen will be. Check your projector’s throw ratio in the manual or specs. Calculate: Throw Distance = Screen Width × Throw Ratio. If the calculation exceeds your available space, you need a short-throw projector (lower throw ratio) or a smaller screen. For more detailed guidance, see our projector throw distance calculator.
Gather Tools and Materials
Proper tools make installation safe and efficient. You don’t need an elaborate workshop—most of these tools are standard home repair items or cheap to rent.
Stud Finder
Electronic stud finder ($15-50). Essential for locating ceiling joists. Cheaper models work fine for basic stud detection.
Drill/Driver
Cordless drill with bits for pilot holes and driving screws. 18V or higher recommended for torque when driving lag bolts.
Level
24-inch spirit level to ensure bracket is horizontal. Digital levels ($25+) show exact angles, helpful for projector alignment.
Measuring Tape
25-foot tape measure minimum. Long tape lets you measure across the room for throw distance without moving.
Lag Bolts & Washers
3/8″ or 1/2″ lag bolts, 3-4 inches long, rated for projector weight. Washers distribute pressure on bracket.
Ceiling Mount Bracket
Projector-specific mount rated for your model. Check projector weight and choose bracket rated for 3x that weight.
Cable Clips & Conduit
Cable management clips to secure wires. Conduit or cable channels for in-ceiling routing. CL2/CL3 rated cables only.
Safety Equipment
Ladder tall enough to reach ceiling safely. Safety glasses. Work gloves. Have a second person spotting when on ladder.
Find Ceiling Joists with a Stud Finder
Ceiling joists are the wooden or steel beams that support your ceiling. Mounting bolts must go directly into joists—never solely into drywall. A stud finder locates these structural supports by detecting density changes in the ceiling material.
Steps: Calibrate your stud finder on open drywall first (away from joists). Sweep across the ceiling slowly in the area where you want to mount. Mark both edges of the joist with a pencil. Verify by probing with a thin nail—it should sink resistance-free into a joist, but meet resistance at drywall. You’re looking for a joist that runs the direction your bracket fasteners require (usually left-to-right in most rooms).
Install the Ceiling Mounting Bracket
The bracket is your foundation. It transfers the projector’s full weight to the ceiling joists. Installation is straightforward but must be done carefully—a loose bracket is a falling hazard.
Steps: Position the bracket centered on your joist. Use a level to ensure it’s horizontal. Mark bolt holes with a pencil. Drill pilot holes slightly smaller than your lag bolt diameter. Drive lag bolts through washers into the holes. Hand-tighten first, then use a wrench to fully tighten (don’t over-tighten—you risk stripping the bolt). Use at least 3 bolts, preferably 4, for stability. Test the bracket by hand-pulling—it should not move at all.
Secure the Projector to the Bracket
Now attach the projector itself to the bracket you’ve mounted. Projectors are light but fragile—avoid dropping or banging them. The bracket should have quick-release arms or strap systems. Some use a quick-mount plate.
Steps: Align the projector with the bracket mounting points. Secure using the bracket’s fastening mechanism (typically threaded rods or a quick-release plate). Hand-tighten first to verify alignment, then fully tighten. Most projectors have multiple mounting points—use them all. Test by gently pushing the projector—it should not shift or rattle.
Route Cables Safely Through the Ceiling
Cable routing is often overlooked but critical for safety and longevity. Improperly routed cables can cause fire hazards, electrical damage, or projector malfunction. Use proper conduit and CL2/CL3 rated cables—these are required by code in walls and ceiling cavities.
Steps: Run cables through the ceiling cavity if possible—use conduit or cable channels for protection. Never run loose cables where they can catch on HVAC ducts or electrical wiring. Keep power cables separate from data cables (HDMI, network) to avoid interference. Use cable clips every 2-3 feet to secure cables and prevent sagging. Exit the ceiling cleanly through a wall plate with a gasket to prevent dust entry.
Align and Focus the Projector Image
Now the hard physical work is done. Fine-tuning the image is the last critical step. Even a properly mounted projector pointed at the wrong angle produces a skewed, hard-to-watch image. Most projectors have vertical and horizontal shift adjustments, plus keystone correction for angled mounting.
Steps: Power on the projector and display a test image (a grid or color bars). Adjust the mount’s tilt angle to center the image on the screen—use a level and small adjustments. Use the projector’s zoom ring to size the image to fit the screen (not oversized or undersized). Use vertical and horizontal shift controls to position the image. Finally, use the focus ring to sharpen the image. Keystone correction (digital image skewing) is a last resort—physical alignment is always better.
Test Stability and Verify Installation
Before declaring your installation complete, verify everything is secure and safe. A failed mounting is a disaster—the projector falls, potentially injuring someone below and destroying both the projector and ceiling.
Steps: Firmly but carefully push on the projector from multiple angles—it should not move or creak. Check all bolts one more time with a wrench to ensure they’re tight. Verify cables are secure and not pulling on the projector. Run the projector for 30 minutes and check for overheating or unusual sounds. Review the installation from the ground level—does everything look aligned and stable? If anything feels loose or unstable, immediately stop and re-examine the bolts and mounting.
Safety Considerations and Best Practices
Weight Limits and Hardware Ratings
Every bracket has a weight rating. Choose hardware rated for at least 3x your projector’s weight. A 20-pound projector needs brackets rated for 60+ pounds. Oversizing is never wrong—it’s a safety margin against failure.
Ventilation and Heat Management
Projectors generate heat. Mounted flush to the ceiling without clearance causes the projector to overheat, shortening its lifespan and triggering thermal shutdowns. Leave 12+ inches of clearance above the projector. If your ceiling cavity has insulation directly above, move it aside or create a vent space. In hot climates, add a small exhaust fan to pull hot air away from the projector. For detailed projector care, see our guide on home theater projector maintenance.
Fire Safety and Electrical Codes
Use only CL2 or CL3 rated cables in walls and ceilings. These are fire-rated and required by building codes. Regular cables in ceiling cavities are a fire hazard. Never run power cables through HVAC ducts or in contact with insulation. If you’re uncertain about electrical code compliance, hire a licensed electrician to review your installation.
Accessing the Ceiling
Use a stable ladder tall enough that you’re never fully extended. Have a second person spotting you—never work alone at heights. Wear safety glasses when drilling overhead (dust falls). If you need to access the ceiling frequently (for lamp replacement, adjustments), consider ceiling access panels rather than drilling into finished drywall repeatedly.
Over-Tightening Bolts
There’s a temptation to make bolts as tight as possible. Don’t. Over-tightening can strip threads, crack the bracket, or even crack ceiling joists. Tighten bolts firmly but not to the point where you’re straining with a wrench. Snug is sufficient.
Troubleshooting Common Installation Issues
Projector Overheating or Shutting Down
Check ventilation clearance. Is there 12+ inches of space above the projector? Is the ceiling cavity blocked by insulation? Open up the space, move insulation if needed, and consider adding an exhaust fan. Clean the projector’s air filter—a clogged filter reduces cooling efficiency. Room temperature over 75°F also contributes; aim for cooler installations.
Image is Skewed or Off-Center
The bracket isn’t level, or the projector is misaligned. Use a level on the bracket itself and on the projector’s mounting surface. Most projectors have vertical and horizontal shift controls—use these before resorting to keystone correction. Keystone correction reduces brightness and resolution, so physical alignment is always better.
Cable Noise or Interference
Power cables running parallel to HDMI or network cables cause electromagnetic interference (noise, signal loss). Separate them physically. Run power through a different path or use shielded cables. If the noise persists, try a shorter, higher-quality HDMI cable or switch to fiber optic connections (for long runs).
Projector Vibration or Rattling
Something is loose. Check all bolts connecting the bracket to the ceiling joists and the projector to the bracket. Re-tighten any loose bolts. If vibration persists, check that cables aren’t vibrating against the projector body—use clips to secure them. Some projectors have a small cooling fan; if the projector is on a vibration plane, sound echoes through the ceiling. Adding vibration dampening pads can help.
Difficulty Replacing the Lamp (Lamp-Based Projectors)
Ceiling mounting makes lamp access harder. Plan for this—consider a drop ceiling with removable tiles directly above the projector, or a tilt-down mount that lowers the projector for service. For frequent lamp replacements, this consideration matters more than for laser projectors, which don’t need lamp service.
Post-Installation Maintenance
Monthly Tasks
Clean the projector lens with a soft brush and microfiber cloth. Check for dust in the air intake. Visually inspect the mounting bracket for any visible damage or corrosion. If you notice any unusual sounds or heat, investigate immediately.
Quarterly Tasks
Verify all mounting bolts are still tight using a wrench. Check cables for damage or loose connections. Test the projector’s stability by gently pushing it—there should be zero movement. Clean the ceiling around the projector to prevent dust accumulation.
Annual Tasks
Deep clean the projector’s air filter or replace it if needed. Review the entire installation for any signs of fatigue, rust, or corrosion. For lamp-based projectors, verify lamp condition and plan for replacement. For laser projectors, confirm light output hasn’t degraded (run a brightness test). Check that ventilation isn’t compromised by dust or ceiling debris.
When to Call a Professional
If the bracket or mounting hardware shows rust, cracks, or permanent deformation, professional repair is needed. If you suspect structural damage to ceiling joists (sagging, cracking), have a contractor inspect. Never attempt to repair these yourself—they’re structural safety issues. For guidance on choosing replacement projectors when the time comes, see our complete projector selection guide.
Frequently Asked Questions
What is the ideal ceiling height for a projector?
Most projectors should be mounted at ceiling height or recessed into a soffit, with 12+ inches of clearance above for ventilation. Standard residential ceilings (8-10 feet) work fine for most projectors. The critical factor is not height but throw distance—the horizontal distance between projector and screen.
Do I need to find ceiling joists before mounting?
Yes, absolutely. Ceiling joists are the structural beams supporting your ceiling. Mounting bolts must anchor to joists, never drywall alone. A projector weighs 10-30 lbs; drywall cannot support that. Use a stud finder to locate joists, verify with a probe, and bolt directly into the wood or steel framing.
Can I use drywall anchors instead of bolting to joists?
No. Drywall anchors can hold light items (picture frames, shelves under 15 lbs). A projector is too heavy. Even heavy-duty drywall anchors will fail under sustained weight and vibration. Always use lag bolts anchored to structural joists. This is a non-negotiable safety requirement.
How do I calculate throw distance for my ceiling space?
Use this formula: Throw Distance = Screen Width × Throw Ratio. Example: You have a 100-inch screen and a 1.6:1 throw ratio projector. Needed distance: 100 × 1.6 = 160 inches = 13.3 feet. If your ceiling cavity is only 10 feet, this projector won’t fit—you need a short-throw model with a lower throw ratio. Measure your space before buying a projector.
What’s the safest way to route cables from a ceiling-mounted projector?
Run cables through the ceiling cavity using conduit or cable channels for protection. Keep power cables separate from data cables (HDMI, network) to avoid interference. Never run loose cables where they can contact HVAC ducts or insulation. Use CL2 or CL3 rated cables—these are fire-rated and required by code for in-wall installations. Secure cables with clips every 2-3 feet.
Can I adjust the projector after installation?
Yes. Most ceiling mounts allow tilt, pan, and rotation adjustments. Fine-tune alignment after initial mounting using the bracket’s tilt handles and the projector’s shift controls. Some advanced mounts offer remote-controlled positioning, though this is rare in home setups. Keystone correction (digital image skewing) is available but reduces brightness and resolution—physical alignment is always preferable.
What prevents the projector from overheating when ceiling-mounted?
Provide 12+ inches of clearance above the projector for heat to escape. Ensure the ceiling cavity allows ventilation (move insulation if it’s directly above). Keep room temperature below 75°F if possible. Clean the projector’s air filter every 3 months. In hot climates or tight spaces, consider adding a small exhaust fan to pull heat away from the projector. An overheated projector triggers thermal shutdowns and shortens lifespan.
Is it safe to mount a projector over my couch or seating area?
Only if properly secured and inspected regularly. Ensure the bracket is rated for at least 3x the projector weight. Use bolts anchored to ceiling joists. Verify stability quarterly by hand-testing the mounting. Consider adding a safety cable as a backup. Never rely on a single bolt or anchor point. If a bracket failure occurs, a 20-pound projector falling from 10 feet can cause serious injury.
What if there are no ceiling joists where I want the projector?
You have options: (1) Install a drop ceiling with T-bar systems rated for projector weight. (2) Install a ceiling joist extension (advanced carpentry—hire a contractor). (3) Relocate to an existing joist location. (4) Use a stand mount instead of ceiling mount. Never compromise on structural support—this is a safety issue that cannot be substituted or workaround.
How often should I check the mounting bolts?
Check bolts quarterly with a wrench to ensure they haven’t loosened due to vibration or thermal cycling. Annually, perform a full inspection including visual checks for corrosion or damage. If you notice any unusual sounds or movement, immediately re-check bolts and tighten as needed. Loose bolts are the #1 cause of mounting failures.
You’re Ready to Mount Your Projector
Ceiling mounting a projector is achievable for anyone willing to follow safety protocols and take time with measurements and structural verification. The key is respecting the weight and ensuring proper support. Skip the stud finder or use drywall anchors, and your projector will fall. Do it right—anchor to joists, use proper hardware, verify stability—and your installation will last for years.
The eight steps outlined here cover everything from planning through final stability testing. If you’re uncertain about any step, particularly finding joists or working at heights, don’t hesitate to hire a handyman or electrician. A hundred dollars for professional installation is cheap insurance against a falling projector or ceiling damage.
Once your projector is securely mounted, you’ll appreciate the clean, professional setup it enables. No cables on the floor, no projector on a shelf or stand, just a bright image on your screen with everything out of sight. For help choosing the right projector for your space, see our complete projector selection guide. And if you’re working with specific room dimensions or brightness requirements, explore our guides on projectors for bright rooms and home theater projectors.
Related Installation & Setup Resources
- How to Choose a Projector – Complete decision framework before you buy.
- Calculate Projector Throw Distance – Exact math for your room measurements.
- Best Ultra-Short-Throw Projectors – If your ceiling space is tight.
- Best Home Theater Projectors – Finding the right projector for ceiling mounting.
- Best Projectors for Bright Rooms – Brightness considerations for your space.
- ALR Screens for Ceiling Installations – Optimizing screen quality for mounted projectors.
- Laser vs. Lamp Projectors – Maintenance considerations for long-term ceiling installations.
- Short-Throw vs. Standard Throw Comparison – Which type fits your ceiling height.